Introduction
I moved to the PC from the Amiga in late 1994. For most of these years I didn’t care about the case. In stayed with the simplest cases, though once I chose one with a handle. It wasn’t until the last time I bought a PC, in mid-2009, that I tried to go for something better. Being the cheapskate that I am, I went with a case the local store suggested that wasn’t a known brand but was largely tool-less and with a removable drive cage, which I hoped would help make installing and changing hard drives easier, which was important to me since hard drive upgrades are the most common upgrade I do (the second being graphics cards).
When I got the PC I had a Radeon 3870 and two hard drives, a 250GB from the previous PC plus a 500GB one. I could fit them into the bottom two drive slots and the Radeon was against the top of the three drive slots in the cage. I then upgraded to a Radeon 5750 and got another 500GB drive. That was an okay combination too, because the 5750 was a shorter card.
Then I won a Radeon 5850 and my life got complicated. The card and the hard disk could fit together, just barely. Getting them to co-exist meant long minutes of trying to push the connectors, disconnect and reconnect, move cables out of the way… In short, a little bit of hell. It was a one time experience I forgot about for a while, but then last year I got an SSD, and had to deal with it again, and recently my PC stopped booting, and I thought it might be the 5850, which occasionally started with an awful noise from it fan, so with some effort I took it out and replaced it with the 5750, then found out it was the RAM, but I couldn’t face putting the 5850 back in.
When the Carbide 200R reviews started pouring in it was clear that it’s a good low cost case with ample space for graphics cards, so it became an obvious upgrade target.
Moving to the new case
The Carbide 200R is a tool-less case, but it still requires a screwdriver for installation. First of all, I couldn’t open any of the thumbscrews without one. Then there are the screws for the PSU and motherboard. Once you’ve loosened all the thumbscrews and installed the PSU and motherboard it should be tool-less forever though.
The first thing I did was install the PSU. I did some reading about that the night before, and decided to install it with the fan facing down towards the filter that’s there. It’s the way things are meant to be, although it turned out to be the wrong choice, more about this later.
The second thing I did was install all my hard drives: an SSD and 500GB, 500GB, 250GB drives. The old case had three 3.5″ spaces in its disk cage, which were used by the SSD (with adaptor) and two 500GB drive, and the 250GB with an adaptor in a 5.25″ bay. On the 200R it was amazingly easy to insert the 3.5″ drives. The 2.5″ SSD was a trifle harder to put in, but not really any trouble. There were two minor issues: one of the drives wasn’t held perfectly in place, and moved when I hooked it to the SATA and power cables. It sits well, but when enough pressure is applied it moves. The other issue was that a disk in the bottom slot makes it hard to press one of the latches that opens the front panel, something which I found about later when I tried it, so I moved the drive up a slot (which was very easy to do). In retrospect it’s easy to use the latches on the back side, which don’t have this problem, so I don’t need to be worried about adding another drive.
The reason I wanted to open the front panel was that I wanted to install my DVD and Blu-Ray drives. Removing the cover allows to easily remove the blank covers to insert the drives. Inserting them was as effortless as inserting the 3.5″ drives. The front panel also has ventilation on the sides, with a filter, which means that it’s a good idea to remove it occasionally to clean that filter. I’m sure I’ll forget to do it.
Now it was time to put the motherboard in. There was a slight issue with the alignment of the ports with the back panel, but the misalignment was small and when I tried a USB cable I was able to plug it into all USB ports. The motherboard (a Gigabyte GA-MA790X-UD4) was attached to the case using 5 screws, as opposed to 6 on the previous case, because one of the holes had a mounting that stuck through it instead of offering a place for a screw, but that felt good enough. The top screws were a little harder to get in than I’d like, or than they were to take out in the old case. It feels like there’s a bit less clearance there. Not a big issue though.
Hooking the cables for power, LED’s, etc., was easy but I think it would have been less messy if they were all in a sleeve instead of separate cables. Hooking the sound and fans was also easy. Unfortunately the case only includes a USB 3 cable to the front ports, with no adaptor for USB 2, and my motherboard only has USB 2, so I’m left without functioning front USB ports. (My next planned upgrade is a motherboard, so that should sort out this problem.)
The trouble started when I tried connecting the power cables from the PSU. The large one went in without trouble after getting routed from the back, but the 8-pin one couldn’t fit through the small gap at the top (which might be meant for routing or might not be), and probably wouldn’t have reached the socket even if it did. Routing from the front would have meant it would hug the graphics card and prevent me from putting another one in. As a result I had to flip the PSU so the fan faces up. The large cable was too short to go through the back then, but I was able to route both comfortably on the front of the motherboard. Since even more modern motherboards (like the one I plan to buy) have these connectors at the top I guess this will remain a problem, but it’s possible that a better PSU than my Topower SilentEZ would have longer cables.
The SATA and power cables went to the back, since the three 3.5″ drives are hooked through there, which means a little bit of mess at the back, but better there than at the front. There’s enough space there that this isn’t a problem. Inserting the graphics card (5750 for now) was simple, just a matter of removing two thumb screws.
That was that, and I assembled everything back in. I discovered that one of the rubber fan mounts at the top fell off while I was assembling the PC, and fiddled with it for some seconds to get it back in.
Surprisingly, the PC came back alive as good as before (well, I haven’t checked the 5.25″ drives yet). I started mining bitcoins just recently, and the 5750 now runs at 65c as opposed to 70c before, which is nice.
General impression and conclusion
I like the 200R. Even though it’s just 1cm deeper and 2cm wider than my previous case it feels a lot more roomy. The drive bays are a joy to work with, and although some of the cables and routing was less than perfect, it’s still pretty good. I also like the look of it.
There are a lot of places to add fans, which I don’t care that much about, and I remember that one of the reviews said that adding a fan didn’t help much. I think that the down side of this added ventilation is that more dust can get into the case. I guess I’ll see what happens.
I’m happy with this case so far.
Images
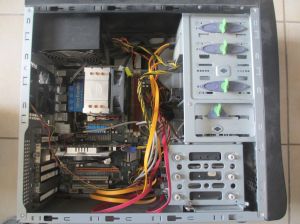
Old case:

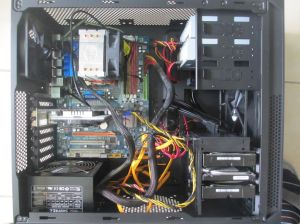
200R:

Links
Carbide 200R manufacturer page
List of reviews (not comprehensive, google for more): Anandtech, X-bit labs, Hexus.net, Kitguru, HardOCP, Tweaktown, Guru3D, The Tech Report.


